Unit Testing – The Secret to Bug-Free Code and Reducing Technical Debt

With the daily advancement of technologies, concepts, computer languages, and project sizes, a development team needs to always ensure their code is bug-free and continuously ensuring it cannot break; just like an impenetrable fortress. If you add a new building to your fortress or remove an old one, the fortress should remain as strong as ever and none of its other functions should be impacted. This is where good construction and architectural skills come, or in our case, development skills and GREAT Unit Testing skills.
There is a lot of different opinions about unit testing and if it should be done, when should it be done, is it worth the time and WHY CAN’T I GET THE 100% CODE COVERAGE! Well here are my two cents.

Levels of Software Testing
There are 4 main levels of testing before shipping your code to QA (these guys…) that are detailed below and ordered by what happens first:
- Unit Testing: It is a way to test an isolated logical small piece of code from a system. In common words, it is a way to ensure each function, method, subroutine or property works by itself perfectly if it was taken out of its current system. This type of test can expose potential flaws in a simple logical piece that you will spend hours finding later. For example, forgetting to handle a divide by 0 exception. Yikes!
- Integration Testing: It is a way to test that all these small logical pieces work together perfectly. The purpose of this test is to find issues in connecting these logical pieces and possible integration defects. Basically, you should be able to use each one of your fingers separately, but you should also be able to use them at the same time as well.
- System Testing: Once all unit tests and integration tests pass, System Testing ensures the whole system works together in a perfect way and meets the technical requirements. This fancy word basically means that your code should run smooth, and this method tests that theory!
- Acceptance Testing: After all the previous testing has been completed, validated, and passed through layers of improvement, Acceptance Testing is where the system is tested for acceptability. Which means the project owner approves it and considers it acceptable for delivery.
In this article, we will focus mainly on Unit Testing and all its ins and outs.
Unit Testing
Almost all languages support Unit Testing, but for this article, we will use Java and JUnit for our code examples.
Unit Testing Method
White Box Testing (also known as Clear Box Testing, Open Box Testing, Glass Box Testing, Transparent Box Testing, Code-Based Testing, or Structural Testing) is the common method used for writing unit tests. It is the concept of testing a known function or code and ensuring all legal (valid and invalid) and illegal inputs, and scenarios are tested.
When to Perform Unit Tests and Who Performs Them
Unit tests are the very first layer of testing performed to the system. It is performed before the Acceptance Testing starts, and has to pass before going to the next step.
They are written by the developers that wrote the code being tested. For example, the person that wrote the “add” function to the calculator is usually the same person that writes its unit tests in a non Test-Driven Development approach (discussed more later).
Unit tests should be run manually, after major code changes before confirming the completion of the code, and automatically with a CI tool after completion as a whole test suite.
Unit Testing Techniques
One of the main metrics, which decides the validity of your unit tests and how much of the code have you actually tested, is a concept called Code Coverage. Below are some of the coverage techniques and methods used:
- Statement Coverage
- Decision Coverage
- Branch Coverage
- Condition Coverage
- Finite State Machine Coverage
We will not go in details on Code Coverage, but here is a great read for you Code Coverage Tutorial.
Test-Driven Development (TDD)
Coding and Unit Tests are always in conflict and one always comes before the other. In an eternal battle of who comes first, code usually wins. Unit tests are usually left till the end, or even worse… COMPLETELY FORGOTTEN!

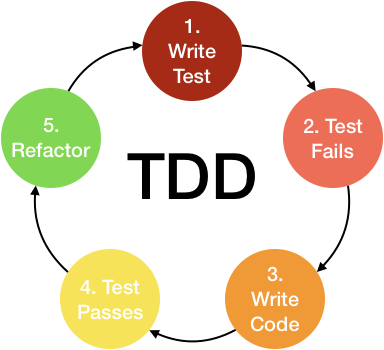
Test-Driven Development, or TDD, is a different approach to writing software that helps ensure flawless delivery from the first line of code. It follows the concept of writing your scenario before you actually write the functional code. Better explained below:
- Write Test
- Test Fails
- Write Code
- Test Passes
- Refactor
- Repeat above for next logical piece
Let’s use a basic calculator “division” function as our code example and follow each step one by one (full code can be found here).
The first thing would be is to decide on the requirements of the logical piece we are trying to implement and write the unit tests matching said requirements. In our case, a division function in a basic calculator should accept two numbers, integers or decimals, and return the results.
Write Test – Test Fails
The first two steps in TDD is to write a failing unit test as shown below
Unit Test
@Test
public void testDivide() {
    assertEquals(1, calculator.divide(2, 2));
}
Divide Function
public int divide(int x, int y) {
    return 0;
}
When you run the unit test, the test will ALWAYS fail. Our assertEquals parameters are (expecting, actual), which in our case is (expecting=1, actual=0) since our actual code doesn’t do any logic except returning 0.
Write Code -> Test Passes
Now then, since we have a unit test that fails, let’s make this beast work!
Divide Function
public int divide(int x, int y) {
    return x / y;
}
We didn’t change a single thing in our unit test, but just actually made the code work correctly and BOOM! Our unit test is passing. Woot woot!
Refactor -> Repeat
Our unit test is passing, so why should we refactor? Simple. The purpose of refactoring is to improve the design and ensure best practices, correct logic, and maintainable work is used. Now, of course, a divide function is not really complicated and there aren’t many ways you can go about implementing it, but there are certainly a few scenarios we have to consider.
In our code example above, I intentionally made the divide function expecting and returning an integer. Shouldn’t it be a double? YES! And that is why you have to refactor and write more test scenarios!
I’m going to show all of the direct unit tests that should be written for a basic calculator divide function:
Unit Test Suite
@Test
public void testDivide_wholeNumber() {
    assertEquals(1, calculator.divide(2, 2));
}

@Test
public void testDivide_decimal() {
    assertEquals(4, calculator.divide(10, 2.5));
}

@Test
public void testDivide_divideByZero() {
    assertEquals(Double.POSITIVE_INFINITY, calculator.divide(168, 0));
}
Code
public double divide(double x, double y) {
    return x / y;
}
With the updates above, you can see the full unit test suite and the final code that actually works. How can we refactor it even more? What about the divide-by-zero scenario? In our case of Java above, it will just return Infinity. But other languages do not handle it in a graceful way and throw an exception. Let’s continue our process and update the unit test, it will fail, we fix the code, it will pass, and we will have a fortress-like code!
First, the Unit Test below fails,
@Test
public void testDivide_byZero() {
    assertThrows(ArithmeticException.class, () -> {
        calculator.divide(102, 0);
    });
}
Then the Code below fixes it while the remaining tests still pass
public double divide(double x, double y) {
    double results = x / y;
    if (results == Double.POSITIVE_INFINITY || results == Double.NEGATIVE_INFINITY) {
        throw new ArithmeticException("Can't divide by 0");
    }
    return results;
}
Since none of the other tests failed due to our code change, we know that our divide function still works perfectly with the previous scenarios and we didn’t break any logic.
Side note, DO NOT over refactor!!
Aaaaaaand that is how TDD is done!

Unit Testing Pros and Cons
Unit testing can feel like a hassle, extra work, slows development, and affects the performance of the team. Well, these are all myths. To clarify things, let’s review some of the main pros and cons of unit testing:
Unit Testing Pros
- Allows the ability to refactor the codebase at any point in the project without having to worry about breaking the “unknown” code. If the unit tests are written correctly, you can just run them to confirm nothing broke due to new or refactored code. It’s basically a never-ending “Regression Test”.
- Unit tests are meant to validate small pieces of code and not integration pieces, so if a new member joins the project, they can learn what each section of the code does by looking into their unit tests. It’s basically a less boring way to write documentation.
- Since unit tests cover small sections, you can test all of the small sections together or simply your desired piece without having to wait for a full-blown test suite.
- Unit tests ensure there are fewer production issues and bugs introduced at release.
- It will make the QA team job easier.
- It can be manual or automated. What I recommend is that you set up your CI to automatically run all unit tests before committing, merging your code to another branch or deployment.
- Reduce overall maintenance costs since it will be easier to find bugs.
- Reduce Technical Debt (Code Debt). Technical debt is a scary term and should definitely be avoided. Here is a good read about it.
Unit Testin Cons
- You can’t expect it to catch every single error or bug in the system. How trivial the logic can be, it can happen that a scenario is missed or can’t be fully unit tested (for some reason ¯\_(ツ)_/¯). And that is why you still always make sure you QA your code before delivery.
- It is difficult to test larger scenarios relating to outside third-party libraries, servers, or databases. Unit Tests should never make actual server or database calls, which makes it less reliable when it comes to these scenarios as we can’t control breakage from the other side. Unit Testing is for smaller internal pieces in its nature and will not complete integration or system testing.
- In the beginning, it will definitely add to the total project completion time but if written correctly it will reduce maintenance time. So kind of a pro and con.
Tips
- Never connect to a database or server. Use Mocking (mocking is its own little beast! Make sure to read more about it here)
- Add unit testing as a part of your development life cycle. Whether you do TDD or any other form of unit testing approach, ensure you always add unit tests, make all of them pass, you refactor your code, and then commit it.
- Ensure you have one standard naming convention for your tests. I personally like the testFunction_Scenario_Results structure.
- It’s great to get 100% code coverage, but anything above 80% should be enough. Usually, the last 20% or so are automated methods like a database related call, for example, updatedAt or createdAt.
Summary
Unit Testing can be difficult, complex and maybe confusing at the beginning, but it will definitely improve the overall quality of your system and of your skills as a developer. To summarize the summary, Always. Unit. Test.
Thank you for stopping by, and check out some of my colleagues’ posts below.